Last week I decided I would play around with one of the new features in Luminar, a filter called AI Sky Enhancer. Perhaps the timing wasn’t so good though, as yesterday evening I downloaded the newly release Luminar 3, and with the added library function, I was having a bit of trouble navigating the system (since I haven’t yet looked at any resources on how to use the new software). Despite a bit of floundering within the libraries function, the actual photo editing and filters layout remains the same, and I was able to complete my self-appointed task.
This first image wasn’t solely about the sky; it’s kind of hard to ignore the leopard in the tree! I wanted to enhance the natural colours of the sky and bring up some of the shadow areas. I started with the AI Sky Enhancer and added other filters as needed (which was how I approached all the images). I’ve included a split screen showing before and after and the edited image for each one I worked on.
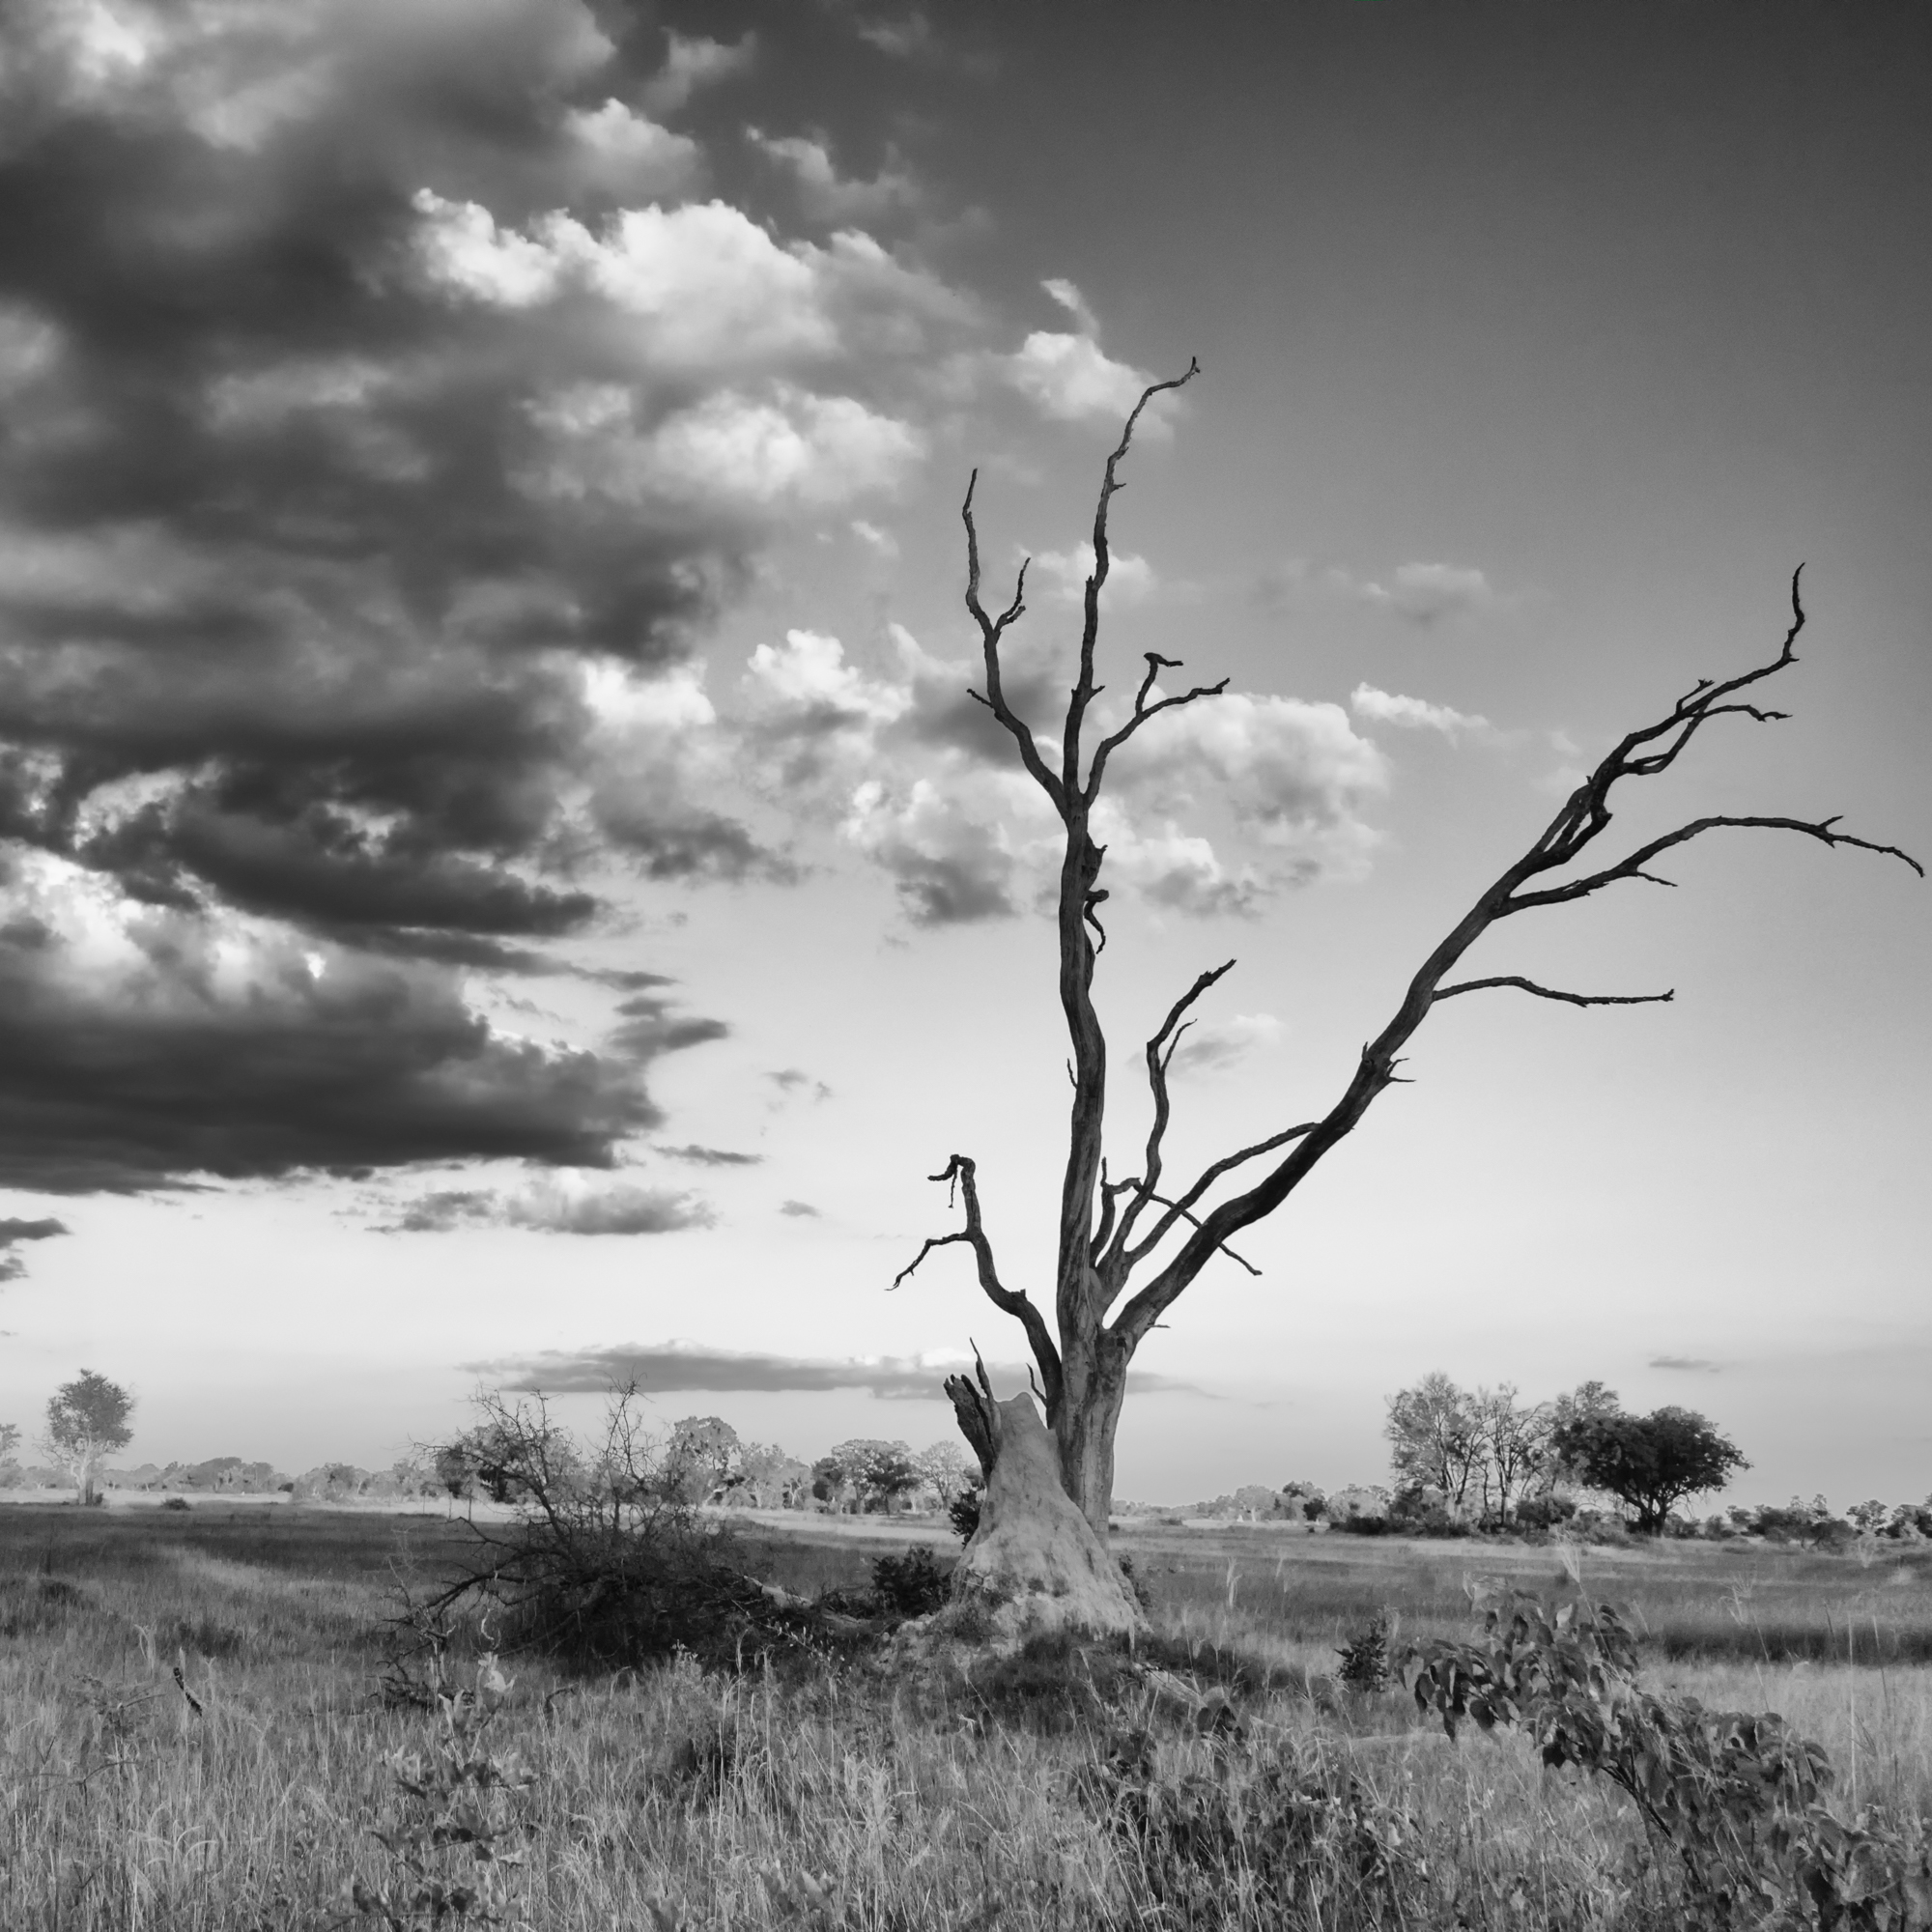
Next up is a photo shot while on a boat on the Boteti River in Botswana. Shooting into the sun left the sky quite washed out; I am impressed how well I could enhance the sky colour and the clouds with Luminar without it becoming to HDR-like.
The Okavango Delta is an amazing place for sunsets; the colours in the sky are incredibly dramatic from my experience. With that much colour already, it is easy to take the image a step too far and have it look radioactive. The AI sky enhancer did a great job accentuating the detail in the clouds, without pumping the colour up to 11.
Finally I have included a sunset from the Hoanib desert in Namibia. There was a lot of airborne dust and sand that evening, so while I did do some noise reduction in the sky to reduce the visible grain, there is definitely still a lot of texture. This was also shot with my Panasonic camera, which is much noisier than the Nikon I was also shooting with. Regardless, I am please with the realistic tones, the detail in the clouds and the textures in the desert and the hills.
I’m going to ow have to spend some time familiarizing myself with the layout of the new Luminar software, so I can work using their library function in an efficient manner.
I think elephants look stunning in a black and white interpretation. The amazing texture of their skin gets emphasized in such a wonderful way.
Lots of wrinkles, and wise eyes.An old bull elephant enjoying a drink in Etosha National Park.This elephant gave us one head shake, but when she realized the rest of the family was completely chill with our presence, she went back to calmly grazing.
This week, I felt inspired to play around in Topaz Impressions and create some of my artistic impression images. Or as I like to say, what I would paint, if I could paint :).
Next week, I am going to try and work with the new AI Sky Enhancer that Luminar just released.
Wishing everyone a fantastic week ahead!
A young elephant seen on an early morning game drive.A leopard scanning the horizon at sunset in the Okavango Delta.A regal lion laying in the tall grass just after sunrise.A large warthog moving through camp.A fiery sunset – Africa has the most expressive skies!
A trio of leopard images to start the week. I hope you enjoying, and wishing you a fantastic week ahead.
We were lucky enough to spend a couple of hours with this beautiful leopard, as day faded into night.Even though I got loads of great photos while it was still out light out, when our ranger got the spotlight out, I had to try for a couple more.A leopard cub descending a fallen tree to play with its sibling.
As mentioned last week, I decided to go with bird images for my last round of editing images with On1 Photo Raw, Topaz Studio and Luminar, seeing how the results compare with the different software choices. I thought bird images would be a great choice because there are lots of fine details in feathers that need to be enhanced, and often things like distracting backgrounds that need to be minimized.
In very broad strokes, I’ve come to realize editing an original image in Topaz Studio that requires colour correction is not something I enjoy doing, and not something I will try to do moving forward (until they provide some updates to that portion of the interface). I don’t find that the colour temperature slider works well enough to deal with complicated colour scenarios, and I can get much better results using On1 Photo Raw, or even Luminar.
The first images I picked are of a purple roller that I spotted on the banks of the Boteti River in Botswana. I decided to edit original images in each program, rather than correcting colour first in On1 Photo Raw and editing the resultant images. For a series of images, it’s obviously not a good strategy, but I really wanted to see the different colour rendering and how well I could adjust the images. The results are mixed.
First up is an image from Luminar. Despite desaturating the blues, the sky still looks a bit too blue and oversaturated. The roller was quite a distance away from me; all of the purple roller images were shot at 300mm, and I think Luminar brought back an acceptable amount of detail in the feathers. There’s only so much you can do with images of a small bird on a distant tree!This is the version from Topaz and try as I might, this was the best I could do with the sky. I find it has an odd colour cast, but I am happy with the detail in the feathers.This is the On1 Photo Raw image. I think the sky in this version is the most true to life. The focus seems a little bit off, but I only had these purple roller images to work with, so I made the best of it. This is the only time I have ever seen a purple roller, so despite the image series being far from perfect, I still wanted to edit and share them because they really are a striking bird.
Next up are some wattled cranes, also seen along the banks of the Boteti River while staying at the fabulous Leroo La Tau camp. While these images were all shot on the same morning, the light was changing very fast and the birds were moving around relative to our vehicle, so some images were shot into the sun and others with the sun at my back. Wattled cranes are listed as a vulnerable species; our guide Calvin had been so excited to see a group of this size while we were out on game drive.
First up is the Luminar version. You can tell from the white hot sky this was shot well after sunrise, and that the sun is already quite high in the sky. I think what I like best about this version is the shimmery effect of the grasses behind the cranes. There is a bit of a warm cast to the image, especially when compare to the On1 Photo Raw version.This Topaz version was shot earlier in the morning, with the sun at a more forgiving angle. I love the postures in this image, with the three birds foraging while one appears to be on sentry duty. I did colour correction for this first in On1, as I gave it a quick go in Topaz and was just getting frustrated with the results.Here are the wattled cranes edited using On1 Photo Raw. I think this and the Topaz versions are the most successful in terms of colour rendering.
Up next are one of my favourite birds, the beautiful lilac breasted roller. Unlike the purple roller, I have seen this bird on all my trips in Africa, and have gotten a few really good shots over the years.
The version from Luminar.The version from Topaz.The version from On1.
These roller images are the best ones for comparing the software, since the bird is fairly close and the light unchanging. I am finding the version from On1 looking a little crunchy when compared to the other two, and the Topaz version lacking a little bit of contrast. I think I was able to bring out the colour and tones the best with Luminar on this particular image. I found Topaz was able to bring out a lot of fine detail in the feathers without making the image look crunchy (it’s hard to see on a web sized image, so you’ll have to take my word for it). I think the On1 version could have done well with backing off the tonal contrast a couple of points; though if that version had been posted in isolation, I would be very happy with it.
I started getting some editing fatigue looking at so many similar images, so I decided for the last few, I would just pick a few one-off bird images, and edit one of each in the various programs.
I edited this image of cormorants using On1 Photo Raw. This was shot during the early morning on Phinda Game Reserve, at one of the large dams on the property. It was a chilly, misty morning, and this cormorant was flying in while hippos were calling the in background. It felt like the reserve was just starting to wake up while we were sitting here.This is an African Hoopoe edited using Topaz Studio. I found the colours in this image flat (no fault of Topaz this time) and thought the image would work much better in black and white.This is a flock of red-billed quelea heading to a roosting spot at sunset. This was probably the largest flock that I have seen, spotted while staying in the Okavango Delta. I know from watching nature programs that these birds can flock in extraordinary numbers.
There are pros and cons to each of the programs; Topaz and the colour correction issues I have been having, Luminar with the lack of adjustable luminosity masks, and with On1, I don’t find the noise reduction function is a good as some other options. But saying that, all the options are robust programs that have a lot of great features, it’s just a matter of learning how to use the tools to your best advantage. I don’t feel like I am in any type of editing disadvantage by choosing to use these software options over the more common Lightroom and Photoshop scenario (that I also used for several years).
From these editing immersions and comparisons, I think I am a getting a little closer to knowing where all these options fit into my workflow.
A group of bull elephants on the banks of the Boteti Rover in Botswana. These males had come down from Nxai Pans to enjoy the water and the lush vegetation around the river, as the seasonal pans dried up. We watched this group cross from one side of the river to the there, stopping part way for a bath and then a wallow in the mud at the edge of the river, before carrying on their way.
Elephants along the Boteti River. Botswana, May, 2017.
My month of Topaz Studio is coming to a close. As with my month of Luminar, taking this time to dive into the program has left me feeling a lot more confident using it, and now it is another tool in my photo editing toolbox that I can use to bring out my vision in the images I have created.
Rather than focus on one specific thing for this post, I wanted to share some of my favourite things about the program.
Bringing out amazing contrast and detail
Back when I used Lightroom and Photoshop, Topaz Detail and Clarity were plugins that I would use when I wanted to highlight texture, especially in feathers and fur. The precision contrast and precision detail adjustments are the same tools found in detail and clarity, though they are still available as the plug in versions or as clarity and detail in studio, which give access to all the fabulous presets that those programs had. On this cheetah image below, I decided to use the precision contrast and detail rather than the in studio version of detail and clarity. Since these are sized for the web, some of the fantastic texture of the fur may be a bit lost, but it is definitely there.
Prior to editing, this cheetah doesn’t look bad, but not great. Keep in mind that this is a raw image and no matter what, it needs some editing to look its best.Using Topaz Studio, I was able to use precision detail and contrast to really highlight the beautiful texture of fur on this cheetah. Cropped for composition and the usual colour correction adjustments completed as well.
Creating my artistic impression images
I’ve always enjoyed the Topaz Impression and Simplify plug-ins, allowing me to create painterly and whimsical effects to my images. Sometimes over to the top, sometimes subdued, those programs allow me to create something different with my images, and I love the flexibility they give me.
A bull elephant crossing the Boteti River to join other members of the bachelor herd that had congregated on the other side earlier in the day. This version was created in Topaz Studio using some of the adjustments, and then working in Impression in Studio until I had the dreamy feel I was looking for.
Quickly reviving lost detail
I think my favourite discovery in the Topaz Studio program has been the AI Clear adjustment, and it is one I am absolutely going to purchase to make sure I have it available to me. Many times I find myself out and about with a great scene in front of me, or a moment I want to remember, but the light is fading or there are deep shadows or perhaps fog (sometimes all of the above). I have found that the AI Clear adjustment can really get images like these back from looking grainy and soft, to full of detail and life. It’s just one step in the editing process, but it certainly is a powerful tool.
The unedited version of Wild Dogs in the Okavango Delta. This group was far enough from the vehicle that I was shooting at 300mm. Knowing how quickly the dogs move about, I shot at f11 and 1/800 sec to try and keep as much of the group in focus as possible, and freeze the motion. These choices meant I was at ISO 6400, leaving a lot of noise in the image.Cropped for composition purposes, and then edited in Topaz Studio. I used quite a few adjustments, but I still had the image finished to my liking in only a couple of minutes. AI Clear did a good portion of the work at the start of the editing process, tidying up the noise and bring back detail to the eyes and the fur, especially to the alpha pair that are on the far left.
I have really been loving the ease of adding my watermark to my images; it is certainly less cumbersome than that current way I have to do so in On1. One of the drawbacks I have found with Topaz Studio is not being able to resize and export directly from the program. It means that for images being posted to the blog or my Instagram page, they always need a round trip back to On1 in order to be resized and exported. Not a deal breaker at all, but just adding an extra step to the process.
If you don’t have it already, I would absolutely recommend downloading Studio and trying it out. Given that the program is free to use with several adjustments, and there are 30 day trials for all the others, there really is nothing to lose (except maybe a little space on your hard drive) to give it a go.