I flagged this image as I was going to work on it over the weekend for my raw conversion comparison that I was doing, but 3 images repeated a few times seemed to be enough so I saved it for a monochrome treatment instead.
I’m glad I did! Doesn’t this guy look striking in back and white? He was so close to our vehicle, I had to crop out bits of the Land Rover that had made it into the frame.
Wishing everyone a fantastic week ahead.
The Piva male leopard seen on Londolozi, May 2017.
I am continuing to enjoy working in Topaz Studio, and now that I am getting more comfortable with the interface, I am starting to notice some differences that may affect how I use the program for future images.
First off, I have noticed that there can be a dramatic difference in how Topaz renders the raw file prior to having any processing done, and it seems to be very dependant on which camera I was using. This lion image was shot with my old Nikon D610 (which I traded in late last year for a Fuji XT-2).
This is the unedited image, exported from ON1 Photo Raw.This is the unedited image from Topaz Studio.For comparison purposes, this is the raw file out of Luminar. The results are quite similar to the On1 version, especially in terms of the colour rendering.
As you can see, with this image there are fairly dramatic differences in the colour rendering, the amount of contrast and detail in the image, and how bright the image is. The raw file appears to have a significant magenta cast in the Topaz file, compared to a more neutral tone in the On1 raw file. I have been finding colour correction a bit tricky with Topaz so far. I think of all the tools I have available to me, Luminar does the best job at correcting colour and especially removing colour casts.
But, even though I started from a different spot editing the raw file in Topaz than I would have from On1, I am happy with the results I was able to get with the image.
Here is the finished image. I spent time with this gorgeous lion early one more whilst on Londolozi Game Reserve in South Africa. May, 2017.
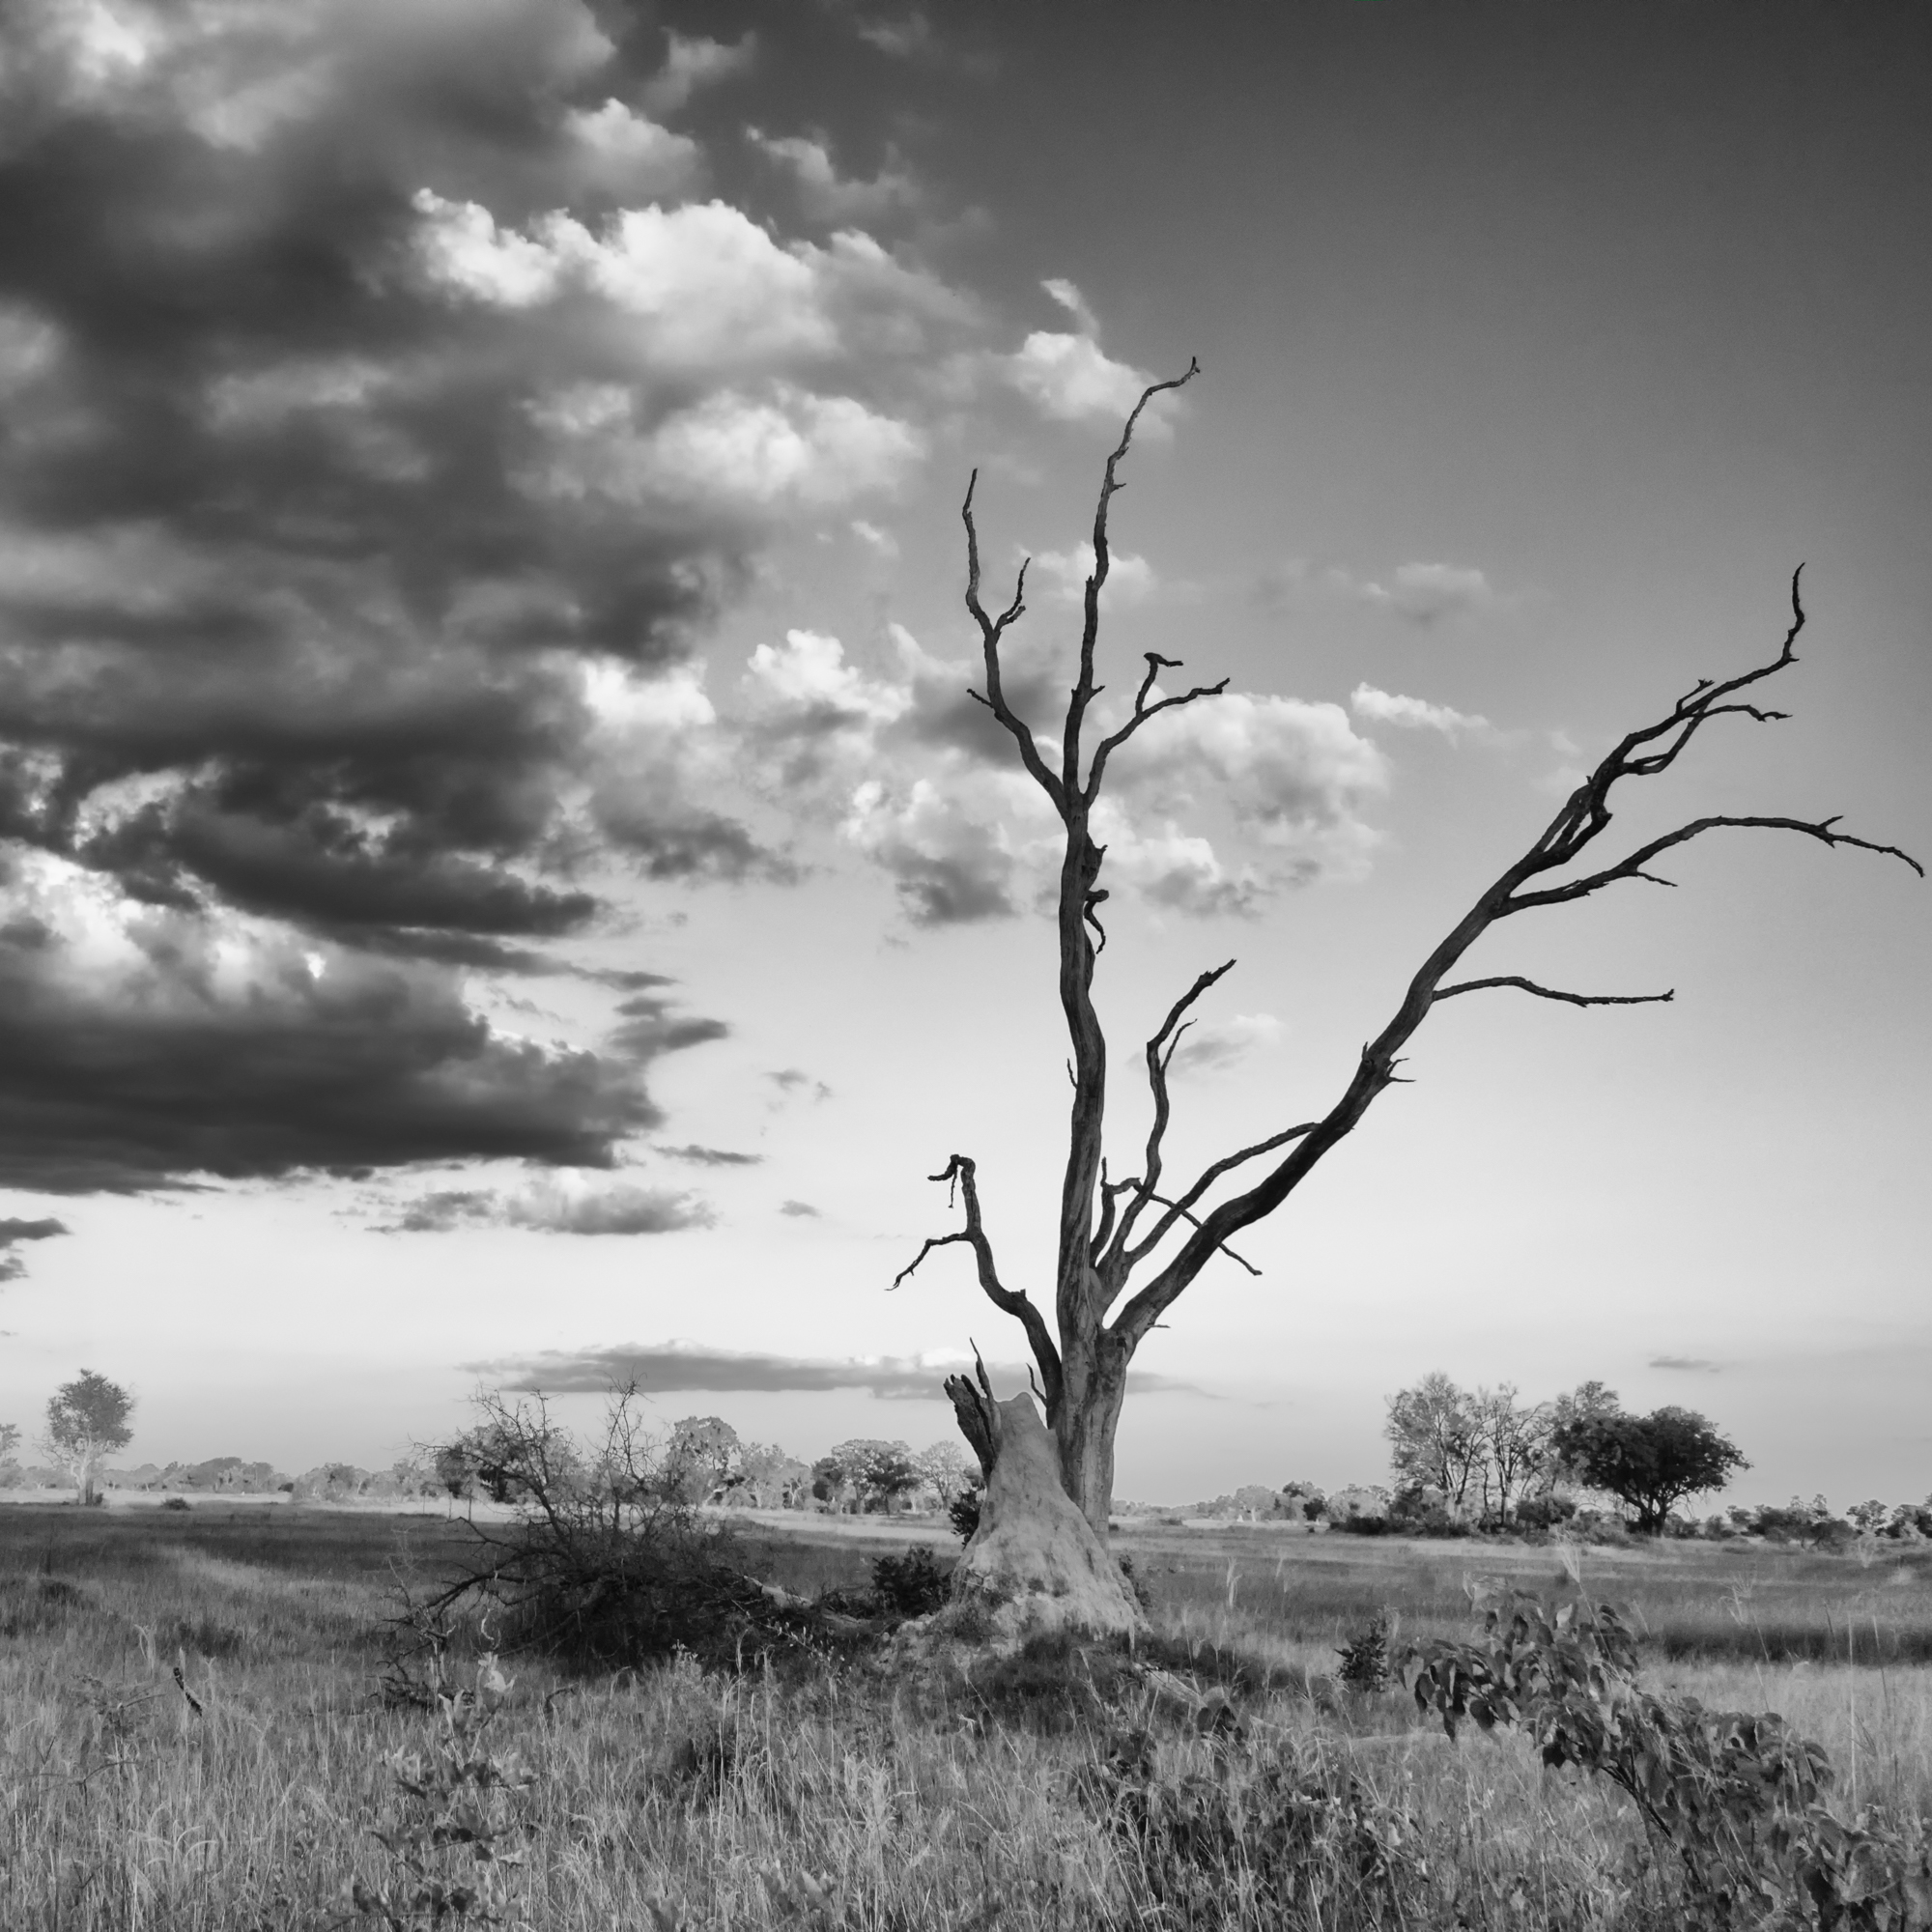
With this next image, the difference in colour rendering was far less between On1 and Topaz Studio, so as with all photo editing, images do need to be looked at on a case by case basis. The landscape image below was shot with my Panasonic FZ1000.
The unedited raw image from On1 Photo Raw.The unedited image from Topaz Studio.
In contrast to the lion image, the raw file in Topaz Studio looks better to me than through On1, a little bit brighter and with a bit more detail.
Here is my final edit of this image through Topaz Studio. I was able to bring out depth of colour and detail in the image, without completely removing the grainy haze from the sand storm that was kicking up in the distance. Taken at Hoanib Camp in Namibia, April 2017.
Here is an image from this summer, shot with my Fuji XT-2. I sure miss sitting outside watching the hummingbirds zip around the yard.
Unedited from On1 Photo Raw.Unedited from Topaz Studio.
The difference in rendering on the Fuji files is far less dramatic. The one out of Topaz looks flatter, but that’s what the editing process is for.
Here is the edited image:
Edited through Topaz to bring out the detail, and get rid of the distracting elements of the background (in this case by cropping them out). On second glance I could have made the image a bit brighter, but since the purpose of this exercise was to look for differences in how the raw image looked, I’ll leave it as is.
After doing a few of these image comparisons, I am finding that there is a consistent, dramatic difference in the way On1 and Topaz render files from my old Nikon camera, with the files being significantly more “true to life” in the On1 rendering. Since I don’t have the Nikon anymore, this isn’t an issue that will plague me beyond finishing up the backlog of images I have that I would like to edit, so I can make smart choices about what software to use when. The differences between the raw rendering with files from my Panasonic or Fuji cameras is not so dramatic, and if I am using Topaz Studio, I have a better starting point with files from those cameras than I do with the Nikon files.
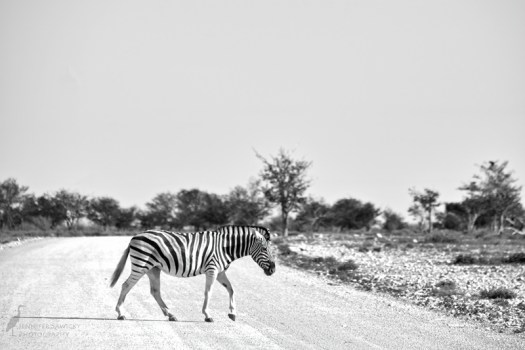
Just a quick single image post for Monochrome Monday this week.
A zebra stopping traffic on one of the roads through Etosha National Park in Namibia. The zebra were very abundant there, and quite chill around vehicles making for some nice opportunities for images. I’ve had lots of experience with zebra taking off in the other direction as soon as they realized you were looking at them.
As I mentioned in my August in Review post, I am going to spend the month of September diving into the Topaz Studio system. I had the full suite of Topaz plugins that I used to use with Photoshop, but the primary resources I used were the Impression and Remask plugins, and I never really spent the time learning the ins and outs of the others. I could utilize them, but I was never familiar enough to be sure which one I needed or to be able to use them to their full potential.
I spent some time this week watching a few tutorials to get a feel for properly using the Studio interface. I had found a few things were not intuitive for me, and watching the tutorials definitely helped. Studio comes with 10 free basic adjustments, and several of the Pro adjustments are included if you previously owned other Topaz products. They also have an option to try Pro adjustments for 30 days before you buy them, so I am going to trial a few additional adjustments that I have seen on the tutorials I have been watching. I have a feeling that may be a bit costly for me, as I have watched and now tried the AI Clear adjustment (which is pretty amazing), but we’ll see how things go once we get to the end of the month.
Below are links to tutorials I have watched so far. The Topaz Labs page on Youtube seems to have a lot of information and taped webinars, so I’m sure I’ll have more to share as the month goes on.
Topaz Studio can do a lot of things, including edit Raw files and save in multiple formats. But there isn’t an option for exporting and resizing for web, so while I am going to try and do all my adjustments through Topaz, I still have to take the files back into On1 to export at the proper size for uploading to the blog or to my Instagram page.
A few other differences to On1 Photo Raw and Luminar that I have noticed are the colour temperature under the basic adjustment is a simple temperature and tint slider, rather than having to opportunity to quickly try different colour temperature presets (daylight, shade etc).
I’ve not had a chance to edit as many photos as I would like this week, but I am impressed with the results of what I’ve had the chance to work on. I’m posting 3 before and after images for reference; if anyone is interest in the adjustments I used to create the final images, please let me know and I will post screen shots.
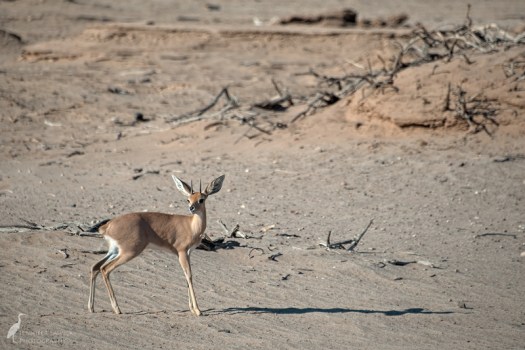
Here is a steenbok spotted near the Hoanib Camp in Namibia:
Before editing in Topaz Studio.After editing in Topaz Studio.
An oryx, also spotted near Hoanib Camp:
Before editing with Topaz Studio.After editing with Topaz Studio.
A springbok spotted while on a game drive in Etosha National Park:
Before editing with Topaz Studio.After editing with Topaz Studio.
The springbok image is the only one that I tried using some presets with. Topaz products such as clarity have the presets for the plugin available for the app. Using a preset, and then carrying on with other adjustments, was something that I had struggled with on my first pass with the program, but the key is to hit the apply button after working with one preset before moving on to the next. If there are any other Topaz Studio users that are struggling with that, I can post a couple of screen shots, but I found the answer while watching the Youtube presentation linked above featuring Hazel Meredith.
Well, that’s all for this week. I am hoping by next week to have had lots more options to put studio to the test and see what I can come up with.
I mentioned in my post last week that I would concentrate on using Luminar in Windows for the balance of the month. I missed getting this posted before the end of the month, but still wanted to share the images and my thoughts on Luminar in Windows.
First off, thankfully the clone and stamp issue that I found the first time I opened my version of Luminar in Windows had been corrected once I updated the software. Basically what was happening is the clone and stamp layer would appear to work normally, but then would disappear once you clicked done on the clone and stamp module. A bit frustrating, so I am glad that is no longer an issue.
I had read in a few blogs that there were a couple fewer filters on the Windows version; I didn’t count them myself and never found I was missing a tool I wanted to use, so that’s definitely not a concern for me. The one thing I really enjoyed was using the touchscreen for creating masks; my Windows machine is a Microsoft Surface complete with the Surface Stylus. What a huge difference using that made in terms of accuracy. I never transferred my logo file to my Windows machine, so I had to open up the edited files on my Mac to add a logo and then export. I didn’t have any issues with using the files on different systems, which is a good thing as I don’t see leaving my Mac as my main editing machine any time soon, but it does mean that I can work on the road and transition to home in a fairly seamless way.
I’m going to say for my editing purposes, there really isn’t any difference between Mac and Windows for using Luminar. Others may have a different experience, but I didn’t have any issues.
I decided on leopard images as I knew I had some that had some with contrast issues, some wonky colours to deal with and an images where I would need to test the clone and stamp. And Leopards in Luminar just has a nice ring to it, don’t you think?
A leopard cub explores the bottom of a ravine. This image had some serious contrast issues due to the deep shadows and very bright mid morning sun. I am happy with the way this turned out.A mama leopard carrying her cub to a new den site. This image had some strange colour casts, and despite being able to correct it in Luminar, I tried a black and white filter and much preferred the result.This is definitely not the look you want a leopard to be giving you. This mama heard another leopard calling nearby, and was not at all pleased. There weren’t too many issues with this image but it did need detail enhancement to be applied carefully so as not to accentuate the noise in this early morning, shady, high ISO shot.A leopard perched in a tree at sunset in the Okavango Delta. This image had some need of the clone and stamp tool; I don’t know if it was a sensor spot or a bug, but there was something that was very distracting in the blue sky that I had to get rid of.
Since it has been far too smoky to get out shooting, I decided I needed a theme for my Luminar editing this week, and I decided on elephants (surprise!). I’ve not watched any more Luminar tutorials this week, but I have decided for the balance of the month I am going to search out resources on Luminar for Windows, as the program is a bit less advanced than the Mac version.
I actually tried to edit an image on my Windows computer using Luminar, but got frustrated with a clone and stamp issue and gave up. Currently, I’m letting that computer download the latest update while I write this, so perhaps the issue will be resolved with the latest version.
Editing elephant images has given me a chance to work with a variety of tools to bring out texture and contrast. An elephant’s wrinkly skin is such a wonderful feature, and raw files really need to be worked with to bring that back to life. I’ve found that Luminar does an excellent job with this, but you definitely need a gentle hand with the adjustments as they can go up to 11 very quickly. The other feature I am enjoying on Luminar is the Accent AI slider. It analyzes an image and tries to adjust automatically for exposure, contrast, clarity, saturation… but like the filters that affect details, I find it it needs to be used with a gentle touch, otherwise the image starts to look overdone.
I hope you enjoy my selections for the week. Wishing everyone a great week ahead.
One of the desert adapted elephants in the Hoanib River bed. Namibia, April 2017.A pair of elephants checking us out before heading down to drink. Phinda Game Reserve, May 2017.Seeing double – a pair of juvenile elephants along the edge of a dam on Phinda Game Reserve.This bull was not particularly pleased with our presence, and shot out a blast of air from his trunk, sending sand up all around him, like confetti. We were driving on the airstrip to give him lots of space on the road, but we certainly didn’t stick around any longer, as he was in musth and we didn’t want to chance annoying him any further.This young lady couldn’t have been more different to the bull elephant above. We were parked on the roadway and she approached us and then just chilled out along the side of the road, waiting while the rest of her family had a drink from a broken water pipe.